
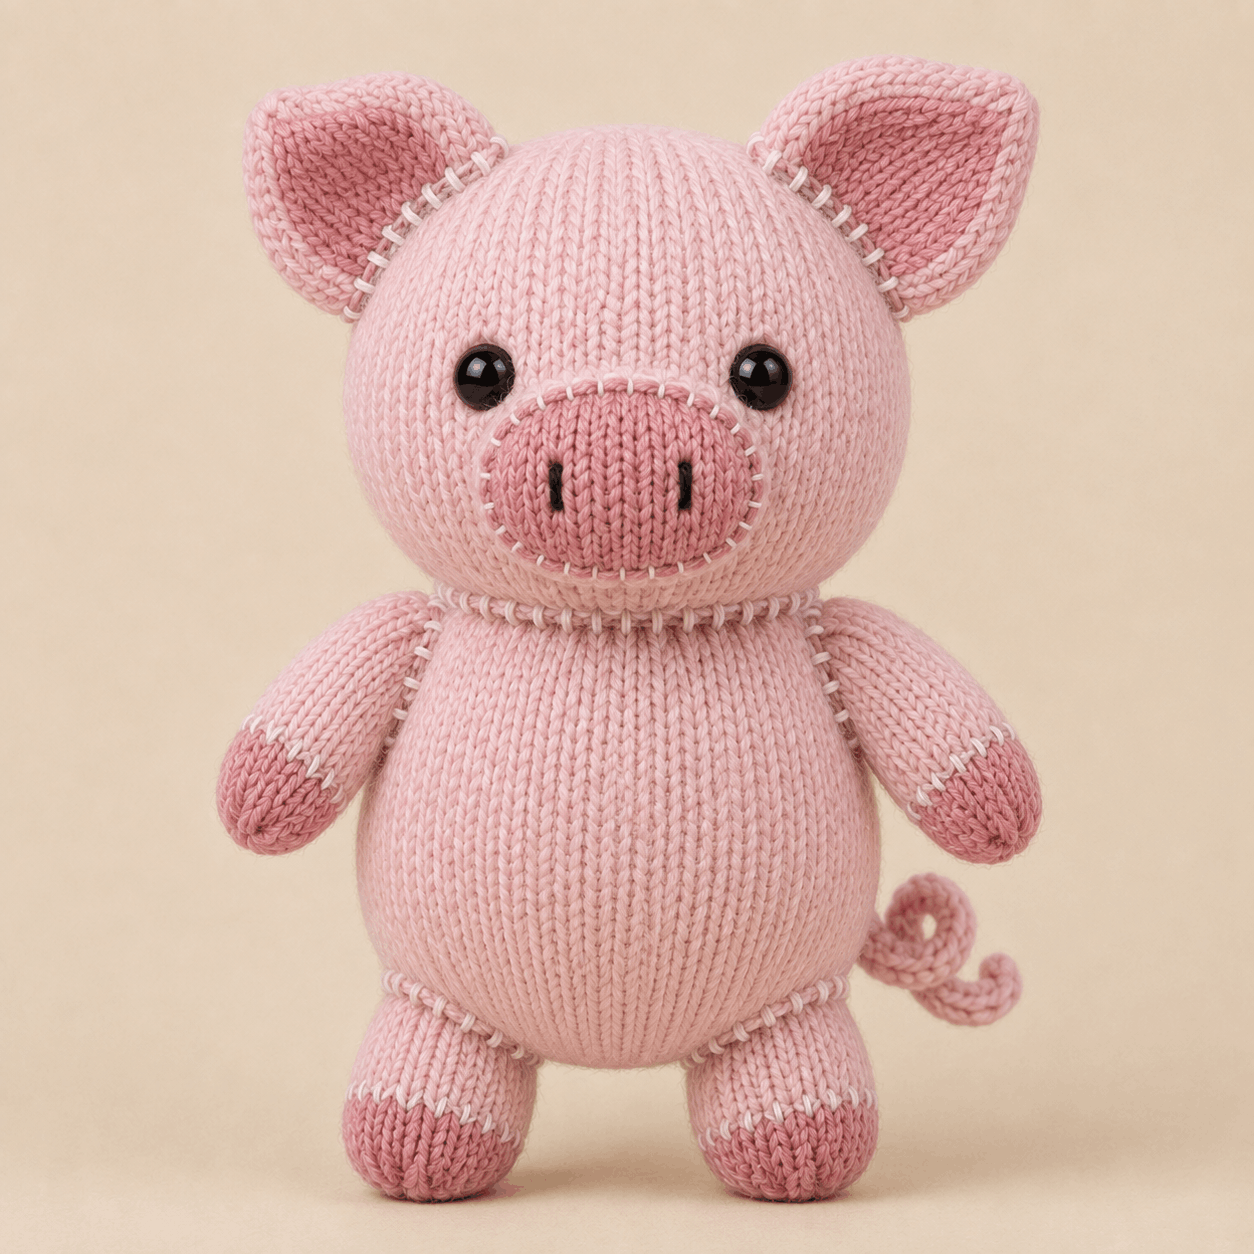
Rosie is a standing knitted piglet plushie with a rounded head, softly shaped body, rosy muzzle and hooves, upright ears and a curled i-cord tail. This piglet knitting pattern is worked mainly in stockinette stitch in the round, with a flat-knitted muzzle and decorative ivory stitching added during finishing. The finished design has a clean handmade look, with visible contrast stitches highlighting the neck, muzzle, ears and limb joins.
The pattern is rated Confident Beginner to Intermediate. It uses familiar knitting techniques, but accurate placement and careful assembly are important to achieving Rosie’s balanced shape. Below you will find an overview of the yarn, techniques, construction, sizing and finishing process. The complete round-by-round and row-by-row instructions are available in the downloadable PDF near the bottom.
About This Piglet Knitting Pattern
Rosie is designed as a stuffed standing piglet rather than a flat decoration. Her proportions are intentionally soft and rounded, with a large head above a gently tapered body and relatively short arms and legs.
The main colour is Blush Pink, while Dusty Rose creates the darker muzzle, hoof tips, arm tips and tail. Warm Ivory is used sparingly for the visible seam stitching that outlines several joins and colour-change areas.
The face is simple but distinctive. A broad padded oval muzzle sits at centre front with two vertical black embroidered nostrils. The eyes can be made with 14–15 mm black safety eyes or embroidered with black yarn.
Rosie’s ears are hollow and unstuffed. They are shaped into shallow cups rather than being pressed completely flat, helping them stand outward from the head. At the back, a narrow four-stitch i-cord forms the curled piglet tail.
These details make the project more interesting than a basic round plushie while keeping the knitting itself relatively approachable.
Skill Level, Making Time and Finished Size
Craft: Knitting
Project type: Stuffed piglet plushie
Skill level: Confident Beginner to Intermediate
Construction: Mainly worked in continuous stockinette rounds, with a flat-knitted muzzle and i-cord tail
Terminology: Standard knitting terminology
Overall height including ears: Approximately 35–37 cm / 13.75–14.5 in
Standing height from hoof base to crown: Approximately 30–32 cm / 11.75–12.5 in
Maximum width across arms: Approximately 20–22 cm / 7.9–8.7 in
The head is approximately 12.5–13.5 cm wide and 13–14 cm high. The body is approximately 11.5–12.5 cm wide and 13–14 cm high. Each ear is around 6–6.5 cm wide at the base, while the arms measure approximately 7–8 cm long and the legs about 5.5–6.5 cm.
The tail measures approximately 18–20 cm before coiling and projects about 6–8 cm after shaping.
The PDF does not provide an estimated completion time. Although much of this piglet knitting pattern uses straightforward stockinette knitting, extra care is needed when positioning the paired ears and limbs and when joining the head evenly to the body.
Materials and Tools You Will Need
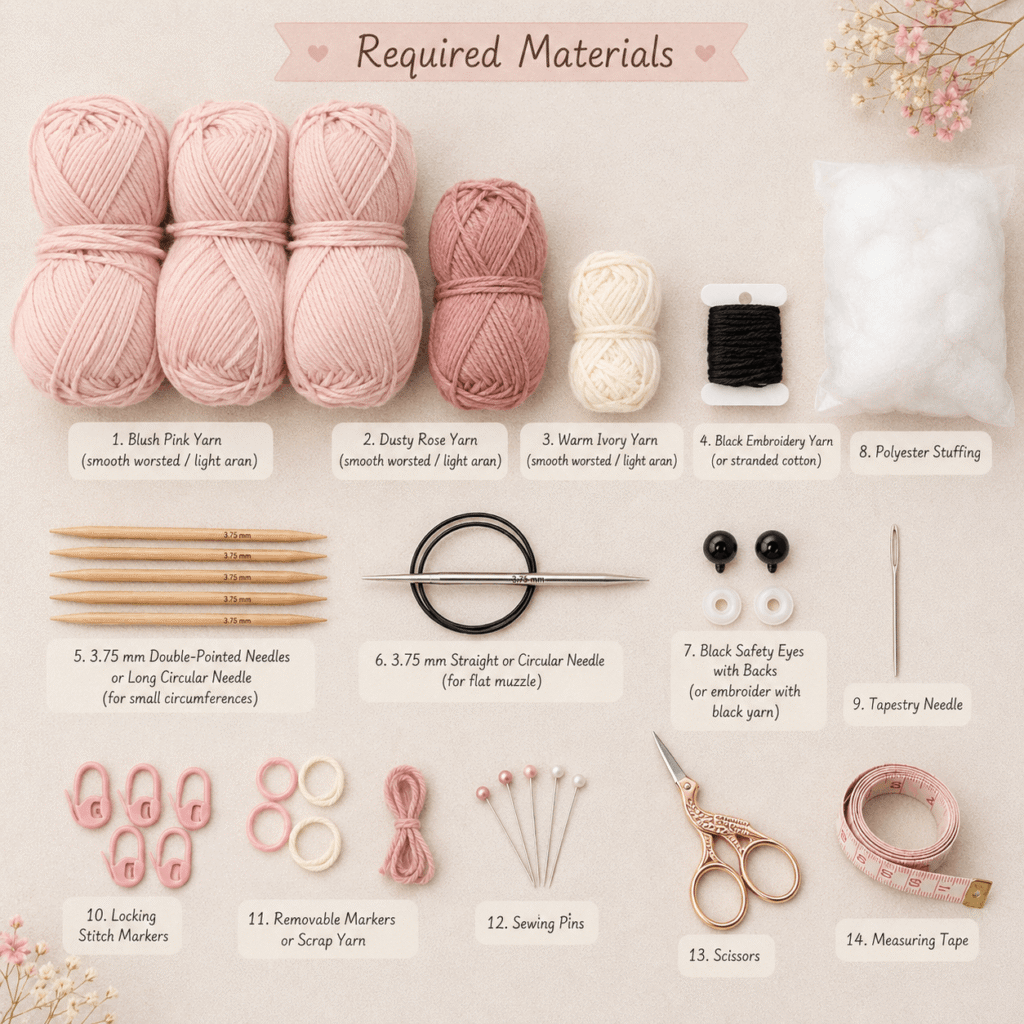
The pattern calls for smooth, tightly plied medium / #4 worsted or light aran yarn.
The approximate yarn amounts are:
- Blush Pink: 170–200 g / 310–360 m
- Dusty Rose: 35–45 g / 65–85 m
- Warm Ivory: 8–10 g / 15–20 m
- Black embroidery yarn or stranded cotton: approximately 1–2 m
You will need 3.75 mm knitting needles suitable for working small circumferences. The PDF suggests double-pointed needles or a long circular needle for magic loop. A 3.75 mm straight or circular needle is also required for the flat muzzle.
Other supplies include polyester stuffing, a tapestry needle, locking stitch markers, removable markers or scrap yarn, pins, scissors and a measuring tape. For the face, use either two 14–15 mm black safety eyes with backs or black yarn for embroidered eyes.
Gauge is 22 stitches × 30 rounds = 10 × 10 cm / 4 × 4 in in stockinette stitch in the round before stuffing.
A smooth yarn is particularly useful for Rosie because the pattern relies on clearly visible stitch columns and careful placement. The fabric should remain firm enough to contain stuffing without obvious gaps.
Stitches and Techniques Used
The knitting itself is based on a relatively small group of techniques. Makers should be comfortable with:
- Casting on and binding off
- Knit and purl stitches
- Stockinette stitch
- Knitting in continuous rounds
- Working flat
- kfb increases
- k2tog decreases
- ssk decreases
- Colour changes
- Four-stitch i-cord
- Mattress or ladder stitch
- Sewing stuffed pieces together
- Surface embroidery and decorative stitching
The head, body, ears, arms and legs are worked in continuous rounds and are not turned. The muzzle is knitted flat, with alternating right-side knit and wrong-side purl rows.
The i-cord tail requires a different rhythm: the stitches are slid back to the opposite end of the needle instead of turning the work.
Finishing also plays an important role in this piglet knitting pattern. Structural seams are sewn first with matching yarn. Ivory stitches are added afterward so they remain decorative rather than carrying the weight of an attachment.
How Rosie the Piglet Is Constructed
The head and body are separate rounded pieces worked in the round. Both finish with matching open neck edges, which are later aligned and sewn together.
The eyes are positioned before stuffing when safety eyes are used. For embroidered eyes, the head can be completed and stuffed first.
The muzzle is the main flat-knitted component. Its shaping creates a broad oval, and the two black nostrils are embroidered while the piece is still flat. During assembly, the muzzle is sewn almost completely around the face, lightly stuffed for projection and then closed.
Two ears are worked separately as hollow knitted tubes. They are left unstuffed and attached with their bases flattened into two layers.
The arms and legs begin in Dusty Rose before changing to Blush Pink. Each piece is stuffed before attachment, but the upper few rounds remain softer so the flattened opening can lie neatly against the body.
The tail is a four-stitch Dusty Rose i-cord. After knitting, it is formed into two relaxed curls and lightly tacked at the crossing points.
Assembly then brings together the muzzle, ears, legs, arms, head, body and tail. The Warm Ivory surface stitching is added after the structural joins have been secured.
Helpful Tips for Making This Project
Keep the beginning-of-round marker at centre back on both the head and body. The placement instructions in the piglet knitting pattern rely on centre-front, centre-back and side-axis landmarks, so maintaining this orientation makes assembly much easier.
Check your fabric density before committing to the main pieces. If stuffing can be seen between stitches, the fabric is too open. A smaller needle may help. If the fabric becomes excessively stiff and difficult to shape, the PDF suggests moving up a needle size while keeping the stated gauge as close as possible.
Pin paired components before sewing either one permanently. Position both ears together and compare their height and outward angle from the front and top. Do the same with the arms and legs.
Stuff the limbs gradually. The rosy ends can be firmer, while the upper attachment areas should remain softer. This prevents bulky seams and makes it easier to control the angle of each limb.
When shaping the muzzle, use only a small amount of stuffing. Its purpose is to create gentle projection rather than a hard rounded bump.
Finally, keep the ivory surface stitches relaxed. They should highlight the seams without pulling the knitted fabric inward.
Troubleshooting Common Problems
Why Is Stuffing Showing Between My Stitches?
The most likely causes are loose gauge or overstuffing. Compare your knitting with the stated gauge of 22 stitches and 30 rounds over 10 cm. If the fabric stretches visibly when stuffed, reduce the amount of filling or try a smaller needle.
Why Do the Eyes, Muzzle or Ears Look Uneven?
Use the pattern’s counted placement landmarks rather than relying entirely on visual judgement. Rosie’s face and paired pieces are positioned relative to centre front and specific rounds.
For safety eyes, compare both positions before fastening the backs permanently. If an ear angle is noticeably different after sewing, remove the decorative ivory stitching first, reopen the structural join and re-pin the ear before sewing again.
Why Does the final result of piglet knitting pattern Not Stand Evenly?
Check the legs before altering the body. Both hoof ends should contain similar amounts of stuffing, and their undersides should be gently flattened.
Make sure the two leg attachments sit at matching heights and that the toes point toward centre front instead of rotating outward. Small differences in limb position can noticeably affect a standing plushie’s balance.
Why Is the Curled Tail Becoming Loose?
The i-cord is shaped into two relaxed curls and secured with small hidden tacking stitches. If the curl begins to open, add one or two additional Dusty Rose tacks at the crossing points. Avoid over-securing it, since the tail should retain a soft spiral rather than becoming rigid.
Care Instructions for the Finished Project
Spot-cleaning is a cautious option for preserving Rosie’s stuffing, shaping and decorative seams. Follow the care instructions provided for the yarn you use.
If the knitted surface needs more cleaning, use cool or lukewarm water where appropriate for the yarn and avoid twisting or wringing the plushie. Gently reshape the head, muzzle, ears and limbs while damp and allow the project to air-dry completely away from direct heat.
Inspect the neck, limbs and other sewn joins occasionally if the finished piglet is handled regularly.
The pattern includes optional safety eyes. Safety eyes and other small or rigid components may not be suitable for projects intended for children under three years old. Embroidered black eyes are provided as an alternative. The PDF does not state that the finished toy has undergone formal safety testing.
Leave a Reply