
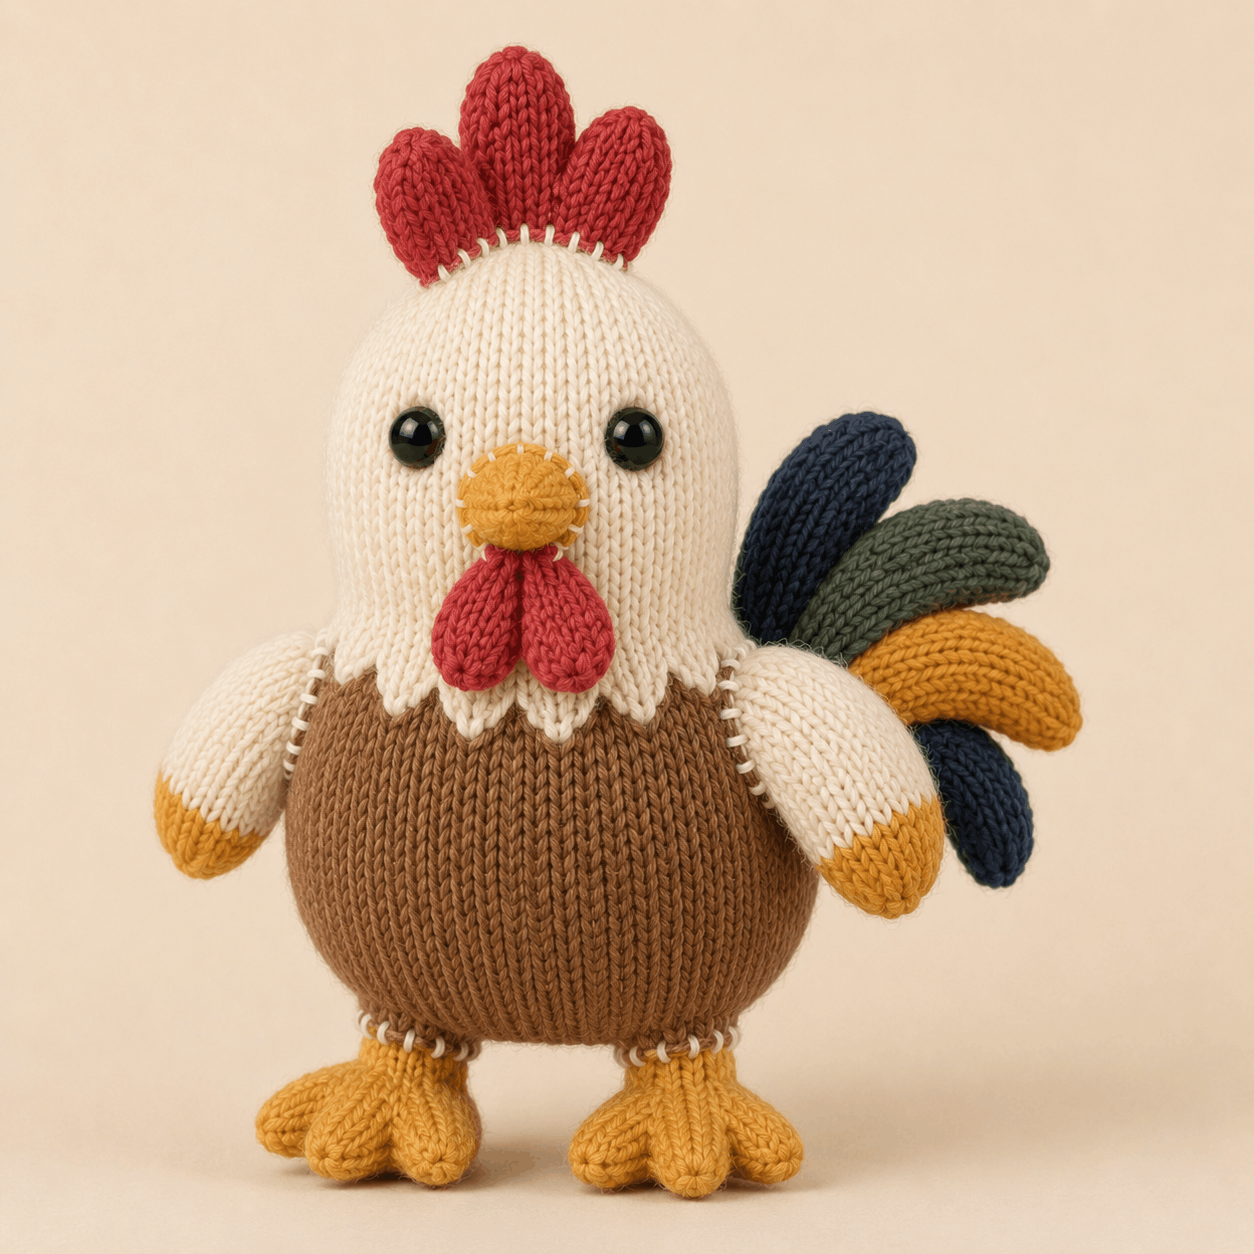
The Harvest Rooster Plushie is a plump knitted bird with a cream head, rounded brown body, golden feet and beak, deep-red comb and wattles, cream-and-gold wings, and a layered seven-feather tail. This rooster knitting pattern is worked mostly in the round, with eight pointed neck feathers knitted flat and sewn around the neck. The PDF rates the project as intermediate, while noting that an adventurous beginner comfortable with small-circumference knitting may also enjoy it. This overview covers the materials, techniques, construction, placement and finishing so you can understand the project before using the complete instructions in the downloadable PDF.
About This Rooster Knitting Pattern
The design has a broad, rounded body and a tall cream head. Its most distinctive feature is the seven-feather tail, arranged as one central navy feather plus paired olive, mustard and lower navy feathers. The color-symmetric fan adds depth without requiring stranded colorwork.
Eight flat-knit cream neck feathers form a scalloped collar over the head-to-body join. Separate pieces create the beak, wattles, three-part comb, wings and feet. The wings change from mustard at the tips to cream at the shoulders, while each foot is assembled from an ankle tube and three toes.
Skill Level, Making Time and Finished Size
Craft: Knitting
Project type: Stuffed rooster plushie
Skill level: Intermediate
Construction: Mostly worked in the round, with flat-knit neck feathers
Terminology: Standard knitting terminology
Gauge: 22 sts × 30 rnds = 10 × 10 cm / 4 × 4 in in stockinette worked in the round
Finished height: Approximately 31–33 cm / 12.25–13 in including the comb
Finished width: Approximately 18–20 cm / 7–8 in from wing tip to wing tip
The body is about 14 cm / 5.5 in high and 11.5–12.5 cm / 4.5–5 in wide, while the head is about 12.5–13.5 cm / 5–5.25 in high. The PDF does not provide a making-time estimate. The parts needing the most care are small-circumference knitting, matching paired pieces, and accurate feature placement.
Materials and Tools You Will Need
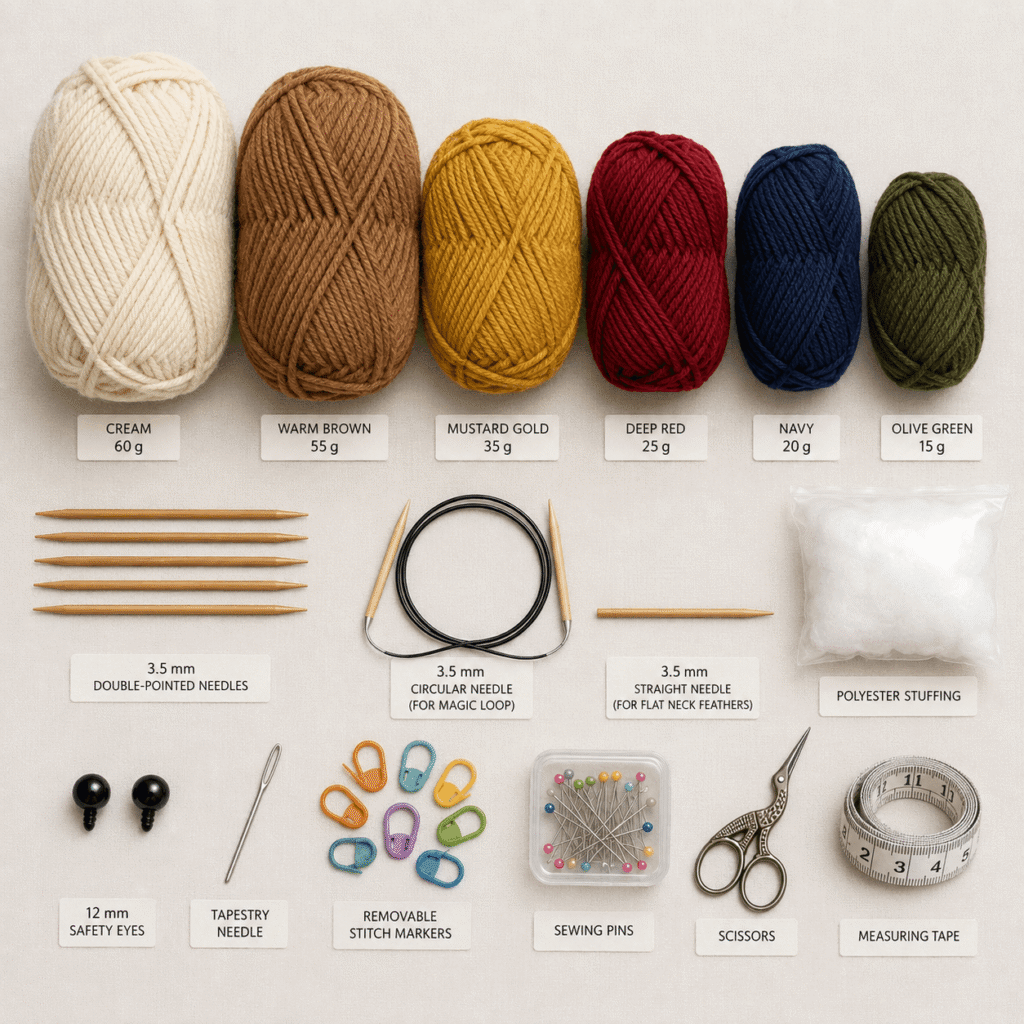
This rooster knitting pattern uses smooth DK or light-worsted yarn, approximately 100–120 m / 109–131 yd per 50 g. The listed amounts are cream 60 g, warm brown 55 g, mustard gold 35 g, deep red 25 g, navy 20 g and olive green 15 g.
You will need 3.5 mm needles suitable for DPNs or magic loop, plus an optional second 3.5 mm needle for the flat neck feathers. Other supplies include polyester stuffing, a tapestry needle, removable stitch markers, pins, scissors and a measuring tape. The face uses two 12 mm black safety eyes or black yarn for embroidered eyes.
Smooth yarn suits this design because the shaping and attachment lines remain easy to see. Keeping all colors at a similar gauge also helps paired pieces stay proportional.
Stitches and Techniques Used
The project uses casting on, knitting, purling, binding off, stockinette in the round, flat knitting, kfb, k2tog, ssk and k3tog. Finishing also involves mattress stitch, ladder stitch and whip stitch.
Most pieces are shaped tubes or rounded forms. The more technical part is assembly, where centre-back, centre-front and side-axis markers help keep the rooster symmetrical. Some open bases are flattened before sewing so the wings and tail feathers sit cleanly against the body.
How the Harvest Rooster Plushie Is Constructed
The warm-brown body and cream head are knitted separately in the round, each finishing with a matching 48-stitch neck opening. The eyes and face pieces are positioned before the head is joined to the body. Eight flat cream neck feathers are then sewn over the join to create the pointed collar.
Each foot is built from one ankle tube and three stuffed toes. The wings are knitted from mustard tips toward cream shoulders and lightly stuffed, leaving the shoulder area soft enough to flatten.
The tail is assembled in layers before the wings: lower navy pair first, then mustard, olive and the central navy feather. The three red comb lobes are attached near the end. This sequence matters in the rooster knitting pattern because the overlaps create the intended fan shape and keep the wing bases clear.
Helpful Tips for Making This Project
Keep the centre-back, centre-front and side-axis markers in place until all major pieces are attached. The placement instructions use those landmarks repeatedly.
Pin paired pieces before sewing. Check the eyes, wings, feet and tail from several angles so differences can be corrected before stitching.
Use controlled stuffing. The body and head need enough filling to hold their rounded shapes, while the wings, tail-feather bases, wattles and comb should stay softer near attachment points.
Leave the tail-feather bases flexible. Overstuffing makes the layered fan harder to flatten and can cause the feathers to droop.
For the wings, keep the beginning-of-round and color-change jog facing the body or underside. This helps the visible cream-and-mustard transition look cleaner.
Shape the feet carefully. The centre toe should point forward and the side toes should splay evenly; together with the slightly flattened body underside, this helps the rooster balance.
Troubleshooting Common Problems
Why Does My Rooster Knitting Pattern Project Sit Unevenly?
If the head leans, check that centre back and centre front are aligned across the neck join and redistribute stuffing if one side is firmer. If the feet do not sit flat, adjust the ankle and toe stuffing, make sure both centre toes point forward, and gently flatten the lower body.
Why Is the Tail Fan Too Narrow or Too Wide?
The seven-feather fan depends on feather angle as well as knitted size. If it looks too narrow, increase the outward angle of the olive, mustard and lower navy pairs. If it spreads too far or droops, bring those pairs slightly closer to centre back and use a small hidden tack between touching feathers. Keep the bases lightly stuffed.
Why Does One Wing Hang Lower?
Both flattened wing shoulders should follow matching vertical side-axis attachment lines. Re-pin the lower wing so its upper and lower endpoints match the opposite side before resewing. The mustard tips should hang downward at similar angles.
If stuffing shows between stitches anywhere in this rooster knitting pattern, first check whether the piece is overfilled. If the fabric itself is loose, compare your stockinette with the stated gauge and consider a smaller needle size.
Care Instructions for the Finished Project
Spot-cleaning is the safest general approach unless the yarn manufacturer recommends another method. Avoid twisting or wringing damp knitted fabric, reshape the body and attached pieces gently, and air-dry completely away from direct heat.
Check sewn features periodically, especially the feet, wings, tail feathers, comb and wattles. If you use the 12 mm safety eyes, small or rigid components may not be suitable for children under three years old. The rooster knitting pattern also provides embroidered eyes as an alternative.
Leave a Reply